Strategy guide · 5 min read
Routefront guide: roads, rings and the race against time
A Routefront strategy guide with real unit stats, how the Ashen Keep's four rings fall, when to take monster camps, and why an early push pays off.

Updated 29 September 2026 · How we write guides
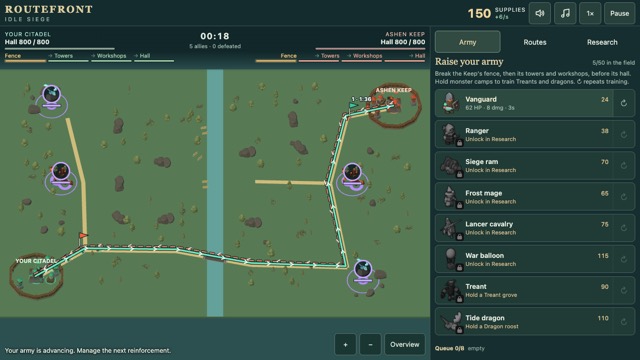 RoutefrontOpen the shortest road to the enemy keep.Play free
How the siege really works
Both strongholds are built the same way, as four rings that must be destroyed in order:
- Fence: ten pieces, a 220-health gate and nine 180-health walls. Knocking down any single piece counts as a breach.
- Towers: three, each with 200 health, firing 6 damage every 1.25 seconds at anything within range, including flyers.
- Workshops: the Supply depot (190 health) and every unit building that has been built (150 each).
- Hall: 800 health. When it falls, the siege is over.
Your army can only damage the ring that is currently up. A melee unit also cannot hit anything inside an intact fence, so until there is a breach, only the fence itself is a target for it. Once a piece falls, your troops walk round the ring to the gap and go in through it.
Every structure you raze pays supplies: 25 for a fence piece, 35 for a tower and 40 for a workshop. Every enemy soldier killed pays 6, and an enemy monster pays 25 more.
Your army, in numbers
| Unit | Cost | Health | Damage | Range | Notes |
|---|---|---|---|---|---|
| Vanguard | 24 | 62 | 8 | melee | Available from the start |
| Ranger | 38 | 34 | 11 | 86 | Hits flyers |
| Siege ram | 70 | 145 | 12 | melee | Triple damage on structures, slow |
| Frost mage | 65 | 42 | 17 | 110 | Freezes 0.8 s, splash |
| Lancer cavalry | 75 | 112 | 15 | melee | Fastest unit, double first hit |
| War balloon | 115 | 125 | 23 | 105 | Flies over walls, splash |
What matters against walls is the structure multiplier. A Vanguard does only 60% of its damage to the fence and a Ranger 35%. A ram does 300% to every ring. In practice one ram does roughly four times the fence damage per second of a Vanguard, for about three times the price, and it takes far more punishment. Balloons do 150% on most rings and double on workshops.
Research costs
Each level of a repeatable upgrade costs 65% of the base price more than the one before.
| Research | First level | Max | Effect |
|---|---|---|---|
| Supply network | 80 | 4 | +2 supplies a second each |
| Tempered weapons | 95 | 4 | +25% unit damage each |
| Reinforced armor | 80 | 4 | +25% health for new units |
| Field barracks | 85 | 3 | 18% faster training each |
| Archery school | 65 | 1 | Rangers |
| Siege workshop | 125 | 1 | Rams |
| Arcane tower | 100 | 1 | Frost mages |
| Royal stables | 110 | 1 | Cavalry |
| Balloon dock | 165 | 1 | Balloons |
| Gatehouse | 110 | 1 | Second path, 20 s to raise |
Reinforced armor only affects units trained after you buy it, so buy it before a big wave, not during one.
The clock is on the Keep's side
The Keep's soldiers grow steadily tougher: about +25% health by five minutes and +50% by ten, and +25% damage by six minutes and +50% by twelve. It also trains faster over time, and it adds unit buildings on a schedule: an archery school at 40 seconds, a siege workshop and stables at 100, an arcane tower at 160 and a balloon dock at 230. It raises its own gatehouse at 150 seconds and marches two paths from then on.
Your upgrades cap higher than its ramp, with up to +100% damage and +100% health, but they cost supplies. The best counter to the ramp is pressure. While any of your units are near its walls, the Keep stops mending its fence and towers, does not rebuild razed workshops, sends no camp expeditions and trains no monsters.
There is one more reason to push early: only workshops that exist count as the third ring. Before 100 seconds the Keep has just its depot and archery school, so a fast breach leaves fewer buildings between you and the hall.
Opening plan
- You start with 160 supplies and 6 a second. Buy Supply network first; it pays for itself in 40 seconds.
- Train a steady stream of Vanguards and unlock the Archery school.
- Look at the Routes tab. One row of roads is always open, but opening a blocked road costs 80 to 170 supplies and takes 8 to 14 seconds. Open one only if it clearly shortens your march, because the Keep can use it too.
- Take the Treant grove on your side of the map before the Keep starts sending expeditions at one minute. Its two guards have 170 health each and heal while left alone, so send enough units to finish them in one go.
Monster camps
There are four camps: two Treant groves beside the middle-row junctions at each edge of the map, and two Dragon roosts at the other two corners. Clear the guards, then stand in the camp uncontested for 4 seconds to claim it, which pays a 30 or 40 supply bounty.
| Camp | Income | Guards | Trains |
|---|---|---|---|
| Treant grove | +2/s | 2 × 170 hp | Treant, 90 supplies, 75 s cooldown |
| Dragon roost | +3/s | 1 × 260 hp, flying | Tide dragon, 110 supplies, 90 s cooldown |
The roost's guard flies, so melee units cannot touch it. Send Rangers or Frost mages. A Treant has 520 health and double damage against the fence, which makes it an excellent breaching unit.
Taking an enemy-held camp is two steps: 4 seconds to knock the owner out, then 4 more to claim it.
Mid and late game
- Once rams are unlocked, send them with an escort. They are slow, and melee escorts absorb tower fire.
- When the Keep builds its balloon dock, keep Rangers or mages in every wave. Melee units cannot hit balloons or dragons, but your towers can.
- Watch your own workshops. Losing the Supply depot drops income to 3 a second plus camps, and losing a unit building disables that unit until you rebuild it for half its price over 12 seconds.
- Repair fence and towers early. It costs 0.3 supplies per missing health point, and pieces mend at 30 health a second.
Common mistakes
- Sending an all-Vanguard army at an unbroken fence. It barely scratches it.
- Pulling back between waves, which lets the Keep mend its walls for free.
- Opening roads that shorten the Keep's march more than yours.
If you're stuck
Win the economy first: Supply network, one or two camps, then a single large push with rams and ranged support instead of a trickle of units into the towers.
Ready to try it?Routefront is free and runs in your browser.Play now