Strategy guide · 4 min read
Gem Cascade guide: specials, combos and all forty levels
How Gem Cascade's special pieces, combos, obstacles, scoring and coins work, plus what each stretch of the forty levels asks of you and how to pass it.

Updated 29 September 2026 · How we write guides
 Gem CascadeMatch three, build specials, clear the board.Play free
How a level works
Each level gives you a goal and a limit. Most limits are a number of moves; levels 21 to 25 and level 38 run on a clock instead, and there you can make as many moves as you like while the seconds count down. Meet every goal before the limit runs out and you pass. Your stars come from your final score, and a swap that makes no match is simply undone, so you never waste a move on a mistake.
When the board has no legal move left, it rearranges the loose pieces for you. Ice, crates, vines and locks stay exactly where they were.
Building special pieces
Special pieces are the heart of the game, and the rule for which one you get is precise:
| Match | Special you get | What it does |
|---|---|---|
| Four in a row | row clearer | clears its whole row |
| Four in a column | column clearer | clears its whole column |
| L or T shape | bomb | clears the 3x3 block around it |
| Five in a line | colour bomb | clears every piece of one kind |
Shape beats length: an L or T of five gives a bomb, not a line piece, while five in a straight line always gives a colour bomb. The special appears on the square you swapped into, so you can aim where it lands.
Combos
Swapping two specials together always works, even without a match, and always does more than either one alone.
- Line and line: clears a full row and a full column.
- Line and bomb: clears three rows and three columns.
- Bomb and bomb: clears a 5x5 area.
- Colour bomb and a line or bomb: every piece of that kind turns into that special, then they all go off.
- Colour bomb and colour bomb: clears the whole board.
- Colour bomb and a plain piece: clears every piece of that kind.
A colour bomb can be swapped with anything next to it. Row and column clearers and bombs need a match or a partner special to fire, so you can park them until a combo lines up.
Scoring
| Event | Points |
|---|---|
| Each piece cleared | 60, multiplied by the cascade step |
| Building a special | 120 |
| Each layer of ice broken | 50 |
| Each hit on a crate or vine | 40 |
| Each acorn brought down | 500 |
The cascade multiplier is why low swaps score so well. A piece cleared in the third chain reaction of a move is worth three times one cleared by your swap. New pieces never drop in already matched, but they often complete a match as they settle.
Obstacles
- Ice sits under a piece. You can still swap that piece; matching it breaks one layer.
- Crates break when a match happens next to them. The reinforced crate takes two hits.
- Vines behave like crates, but they spread. If you go two moves without damaging any vine, one vine takes over a neighbouring piece (three moves on levels 37 and 40).
- Locked pieces cannot be swapped until they have been cleared once by a match.
- Acorns are brought down, not matched: clear the pieces under an acorn until it reaches the bottom row.
The forty levels at a glance
| Levels | What they teach | What to focus on |
|---|---|---|
| 1 to 5 | scores and clearing one kind of piece | making specials early |
| 6 to 10 | ice | matches on iced squares; level 10 gives 70 moves for 32 ice |
| 11 to 15 | crates, sometimes with ice | matching beside crates, bombs for clusters |
| 16 to 20 | mixed boards, six kinds on level 20 | reading the board shape |
| 21 to 25 | timed levels | speed over perfection |
| 26 to 30 | acorns | clearing columns below each acorn |
| 31 to 35 | vines | hitting vines every move or two |
| 36 to 40 | everything together | combos; level 40 asks for vines, ice and acorns at once |
Boards with six kinds of piece (levels 20, 25, 30, 35, 36, 38, 39 and 40) produce fewer natural matches, which makes every special you build more valuable.
Coins and boosters
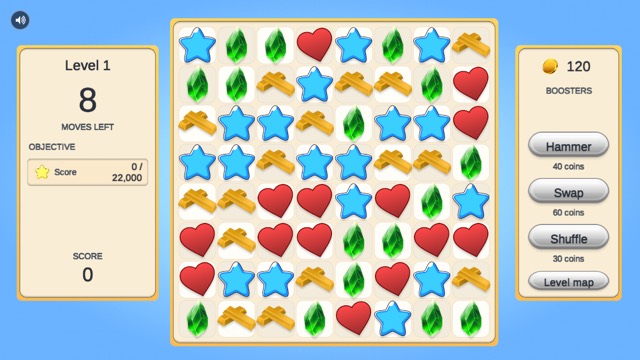
You start with 120 coins. Every win pays 15 coins, plus 5 more for every four levels into the map, plus 10 per star, and replaying a level you have already passed pays again.
| Booster | Price | What it does |
|---|---|---|
| Hammer | 40 | smashes one square: a piece, a crate or a vine |
| Swap | 60 | trades two neighbours, no match needed |
| Shuffle | 30 | rearranges the loose pieces |
Boosters never cost a move, and you are only charged if the booster can actually act. The Hammer is the best value on vine levels, where one smashed vine can stop a spread.
Common mistakes
- Firing a special the moment you make it. Two specials swapped together beat both used alone.
- Chasing score on a clearing level. If the goal is ice or crates, points will not pass the level.
- Ignoring vines for a few moves. Every idle pair of moves adds a vine.
- Matching at the top. Swaps low on the board leave more pieces to fall and chain.
If you're stuck
On a move-limited level, spend the first two or three moves looking for a four or an L rather than taking the first match you see. On a timed level, keep swapping; many quick moves beat a few careful ones. If one goal keeps falling a few short, replay easier levels for coins and bring a Hammer or Swap for the last move.
Ready to try it?Gem Cascade is free and runs in your browser.Play now